What is the Event Day App (Stack Team App)?
Stack Team App is a mobile platform that allows Event Organizers to improve communication by creating a customizable smartphone app with a dynamically updating website. It also allows participants to easily check into their event on the day of their race by including a QR code. The Event Organizer can also create a race day map, and event location map, and communicate with participants at will via email and push notifications.
How Can The App Help Support My Event?
The Stack Endurance team has adopted Stack Team App (STA) to support events at the participant and event organizer (EO) levels.
Event Organizer Features:
- STA allows EOs to send out in-house communications to the participants within their events. Communications can be sent out at both the event and category levels.
- STA is brand-compatible and EOs can adapt the app to their event’s branding and needs.
- Data between Stack Endurance and STA is dynamic. Updates to the events, categories, and participants are sent over to STA automatically and in real-time.
- EOs can add custom links to their app, directing participants to a number of external sites like results, event websites, and more.
Participant Features:
- Participants can access their events’ QR codes for a quick and easy event day check-in experience. The participants QR code works as their “ticket” into the event.
- Event updates/communications are seamlessly delivered to participants via email or push notifications through the app.
- In addition, participants can consume course maps, packet pickup details, and more, assuming the EO has added these features.
Admin Set Up & Configuration
Note: The Stack Team App integration is optional and we highly recommend adding it to all your events.
Enabling Your Event Day App
To turn on the Event Day App/STA integration, follow these steps:
- Log in to the GMR Admin Portal
- Search for the desired event or select it from the event dashboard
- Once on the event summary page, find the “Race Day Tools” section within the Event Details panel.
- Select “Stack Team App Settings”
- This will open the STA integration management page. This page contains instructions highlighting the benefits of the integration as well as steps on how to manage the integration.
- Once you close the instructions, you will see a table containing “Category Settings”. To enable STA for a specific category, simply select the “enable” radio button and save. Note: This tool is flexible, meaning you can have STA enabled for some, none, or all categories within your event.

Enabling QR Codes
To enable check-in QR codes for your event, visit the QR code tool located within GMR. Enabling QR codes for your event assigns each participant a unique code linked to their registration, allowing event staff to quickly retrieve their information during check-in. While not required for integration, this feature is highly recommended to streamline the check-in process and enhance the event experience for participants.
To access the QR code tool, please follow the steps below:
- Log in to the GMR Admin Portal
- Search for the desired event or select it from the event dashboard
- Once on the event summary page, find the “Race Day Tools” section within the Event Details panel.
- Select “QR Code Check-In for Packet Pick Up/Event Day”
- This will open the QR code settings page. This page contains detailed instructions regarding the tool (including the recommended equipment for scanning QR codes on event day).
- After closing the instructions, you will see a table containing “Category Settings”. To enable QR codes for a specific category, simply select the “enable” radio button and save. Note: This tool is flexible, meaning you can have QR codes enabled for some, none, or all categories within your event.

Event Day App Next Steps
Now that the Event Day app is enabled on your event, new participants will begin receiving invitations via email. These emails will instruct them on how to download and access your event’s app. Don’t worry if you had participants register before you enabled the integration, all existing participants will also receive an invitation email.
Logging into The Event Day App
Now that the Event Day app has been enabled for your event, you can log into STA to manage your event’s app. Stack Team App is available on Google Play and the Apple App Store. Simply download the app to your device to get started or go to the Stack Team App website.
When logging in, make sure to use the “Continue with Email” option to trigger the Stack Sports Single Sign On (SS) login flow. For details on Stack Sports SSO please review the SSO user guide. This will ensure you are logging into the same account associated with your GMR account.

Managing Your Event
Once you are logged in, you will land on the “My teams” dashboard. From here, you will be able to view all the events you have access to as an admin (Event Organizer) or member (Participant).
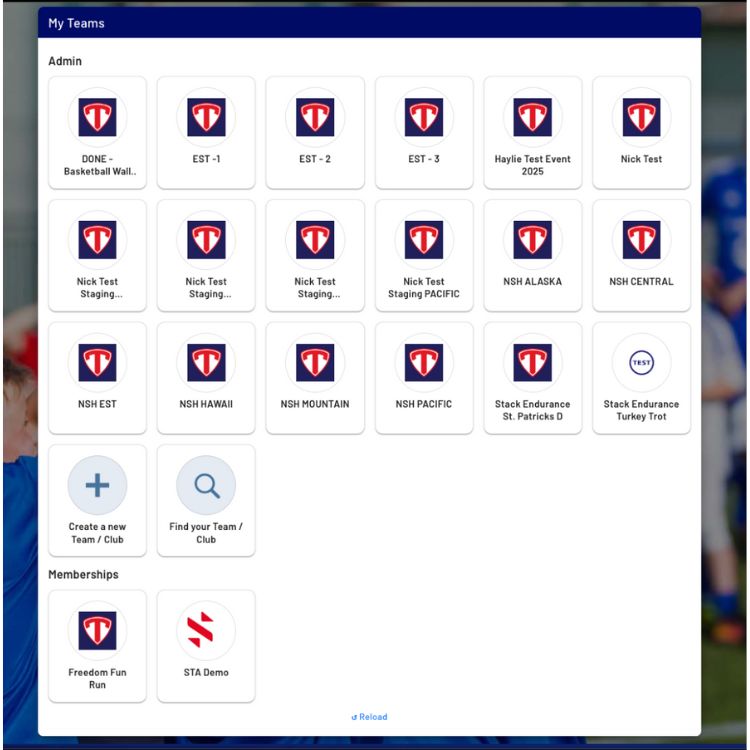
To access an event’s admin dashboard, select the tile for that event. This dashboard is where you will manage your event’s members and access groups, appearance, features, and more.
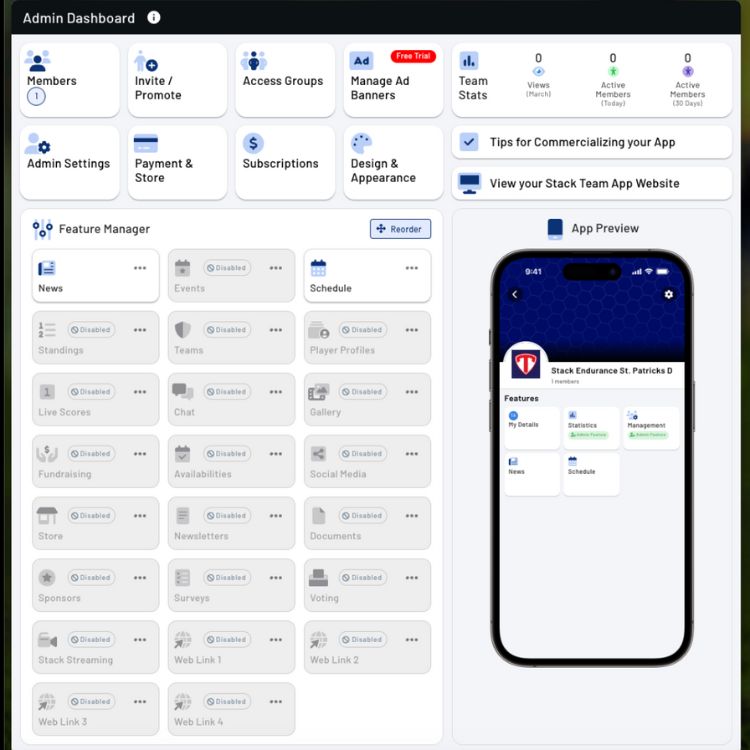
Admin Dashboard
First, let’s focus on the “Admin Dashboard” tiles and what each one represents.

Members Tile
The members tile will show you every user associated with your event. This section will display ALL user types, including both admins & participants. This list will illustrate the member’s level & any access groups they are a part of. For more information on the member tile, click here.
Invite/Promote
Admins can invite members to join the app both individually and via bulk through a variety of methods: email, download a brochure to post to an external website, or promote a link on an external website. For more information, please review this help video.
Access Groups
Participants are automatically assigned to an access group based on the event and category they registered for. In your event, there will be a general access group for all participants, as well as separate access groups for each category where STA is enabled. Access groups are primarily used for event communications, allowing you to send messages to specific groups as needed. For a detailed description of access groups, please review this help video.
Manage Ad Banner
Team App provides the opportunity for exclusive ownership of the ad banners that appear on your app and website. Your organization can profit by buying your ad banners and creating your own ads (via our simple ad creation template) for your sponsors. This option also provides the ability to own the ad space on your app and website to not show any ads if you prefer a no ad experience for your members. Read more here!
Admin Settings
Core settings for each app may be found within the ‘Admin Settings’ section. Within these settings, admins have the ability to control general details about the app (name, address, contract, etc.), along with specific settings on members and roles.
Payment & Store
Team App offers the ability for organizations to sell items directly through the app and website. In order to sell items, administrators must first set up a Stripe account for the ability to process payments through Team App. For more information, click here.
Subscriptions
Team App allows the ability to upload videos (such as highlights, training videos, etc.). Through subscriptions, you can upgrade to Premium Video, enabling admins and members to upload videos up to 1GB.
Design & Appearance
The design & appearance section allows you to manage the look of your event’s app. To learn more, please watch this help video!
Feature Manager
The Feature Manager allows you to control the tools (displayed as tiles) that appear in your event day app. Some features will be disabled by default, but you can easily enable, disable, rename, or reorder them to customize your app experience.
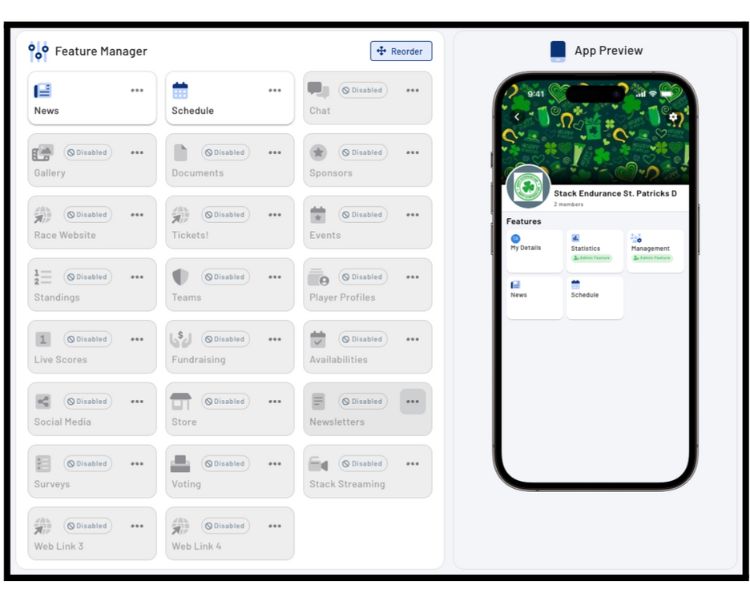
Enabling or Disabling Features
To enable or disable a feature, select the three dots next to the feature tile, then select the toggle button. Enabled features will appear in white, while disabled features will appear grayed out.
Renewing Features
If you’d like to change the name of a feature, select the three dots next to the feature tile, then choose Rename Feature. A text box will appear, allowing you to enter a new name. Once you’ve made your changes, select Save to update the feature name.
Reordering Features
To change the order of your feature tiles, select the Reorder button located in the top-right corner of the Feature Manager. Drag and drop the feature tiles to your preferred order. Once satisfied, select Save to apply the new order. Your app preview (on the right side of the screen) will update in real time as you make changes.
Feature Details
Now, let’s move on to what each feature can be used for.
News Feature
The News feature serves as a powerful communication tool for your app, enabling you to send important updates and announcements to your users. Follow the steps below to create and manage your communications effectively.
Accessing the News Management Page
- Select the News Tile: To create or manage communications, start by selecting the News tile in your app.
- View Past Communications: The News Management page will display a list of all previous communications. Each entry will show:
- The date and time the communication was sent
- The name of the admin who sent it
Creating a New Communication
- Open the Options Menu: On the right side of the News header, select the three dots icon.
- Select “New”: This will open the News Form, where you can enter the details for your new communication.
Completing the News Form
In the News Form, fill out the following details:
Title: Enter a clear and informative title for your communication.
Message: You can compose your message using plain text or custom HTML for enhanced formatting.
Media Attachments: Optional; include images, documents, or videos to support your message.
Access Groups: Specify the groups or users who should receive the communication.
Delivery Options: Choose whether to send the message immediately or schedule it for a future date and time.
Sending Your News Communication
Once submitted, your communication will be delivered via push notification or email, depending on the preferences you and your participants set. By following these steps, you can efficiently manage and share important updates with your app’s audience. Tip: Rename “news” to “Event Updates” or “Event Announcements”.
Schedule Feature
The schedule feature allows users to look at the upcoming schedule for the events they are a part of. Note: The schedule feature will show all categories within the event, even if a participant is not registered to that particular category. This feature offers details like date, time, and location. Additionally, if QR codes are enabled for the category (and the participant is registered to it), their check-in QR code will display here. This gives participants an overview of the event’s schedule so they know what to expect on event day. Tip: Rename “Schedule” to “Event Day Schedule”.
Chat Feature
The chat feature is designed for participants to message within their respective access groups. Note: Currently, there is no way to restrict chat to certain access groups. Therefore, if the chat feature is enabled, all event participants will be permitted to message each other in the event group chat.
Gallery Feature
The Gallery feature serves as a shared album for your event, allowing participants to upload photos and videos. If enabled, participants can contribute content specific to the event or their registered categories. This feature helps foster a sense of community by enabling participants to share memorable moments from your event. Tip: Rename “Gallery” to “Event Photo Gallery” or “Event Photos & Videos”.
Documents Feature
The Documents feature allows you to share files with your event participants. You can upload PDF files and assign them to specific access groups for viewing. Once a document is posted, participants will receive a notification. Tip: This feature is ideal for sharing important information such as course maps, waivers, and more.
Sponsors Feature
The Sponsors feature allows you to showcase the sponsors supporting your event. You can add sponsor details, including their name, description, images, and website links. This helps highlight who they are and what they do. Once added, sponsors will be visible to all event participants.
Events Feature
Admins can create a new event, including features import/export your events and view attendance reports. To learn more, please reference this help video. Note: Events created from the app will be stand-alone and not linked to your GMR account.
Standings Feature
Standings align the teams you create in the Teams feature. Standings are visible via your Teams tile and/or the Standings tile, depending on which tiles are enabled. To learn more, please reference this help video.
Teams Feature
The Teams feature is simply a list of your team names. These team names link to schedules, standings, live scores, player profiles & voting. To learn more, please reference this help video.
Player Profiles Feature
Player profiles offer the ability to display information about each player to your members. To learn more, please reference this help video.
Live Scores Feature
Live Scores align with the teams created in the Teams feature. With Live Scores, you have the choice of manual entry or linking to a website that displays live scores. Manual entry allows entry via the app, which can be enabled for all members or just admins.
Fundraising Feature
This allows your organization or team to generate extra revenue to achieve your goals. Create campaigns, set targets, track your progress, and share your campaigns with both Team App & external members.
Availabilities Feature
Members can enter their availability. Member availability is listed, and members will only see the availability of other members in the same access groups. To learn more, please reference this help video.
Social Media Feature
The social media feature allows you to upload direct links to your social media accounts. This feature supports X, Facebook, Instagram, Pintrist, Youtube, Linkedin, Tumblr, and other external websites.
Store Feature
You can create a store to sell items such as membership fees, merchandise, playing kits, uniforms, and fundraising tickets. Creating a Store requires you to set up a secure payment gateway via Stripe. To learn more, please reference this help video.
Newsletters Feature
Within Newsletters, you can publish content in your app, such as a newsletter, flyer, sports record, or any PDF, or a link to a website. You can choose which access groups have visibility of each newsletter posted. To learn more, please reference this help video.
Surveys Feature
As an admin, you can create a survey for your members and send a notification to your members when your survey is open. Members will also be prompted to respond to your survey when they launch your team’s app. Members who do not have a Team App account will receive an e-mail notification of your survey, but can only complete it once they become a registered app member.
Voting Feature
With the voting feature, you can set up voting for any team you have created in the Teams feature of your app. Voters will receive a notification when voting opens, and can enter votes via the app any time within the voting period. There is no specific voting tile in the app; members enter their votes via a banner they will see in their app or directly via the push notification. To learn more, please reference this help video.
Custom Web Links 1-4
At the bottom of the Feature Manager, you will find four tiles labeled “Custom Web Links.” These tiles allow you to link to external websites of your choice. Tip: Use these links to direct participants to your event website, online store, or other important resources.
Participants
Logging Into Your Event Day App
If you are registered for an event in which the event day app is enabled, you will receive an invitation via email with instructions on how to access your event day app.
The event day app (Stack Team App) is available on Google Play and the Apple App Store. Simply download the app to your device to get started or go to the Stack Team App website. Participants will use their existing Stack Sports SSO credentials to log in to their accounts.
Once logged in, you will see all events under the “Memberships” header. To open an event, select the event tile.
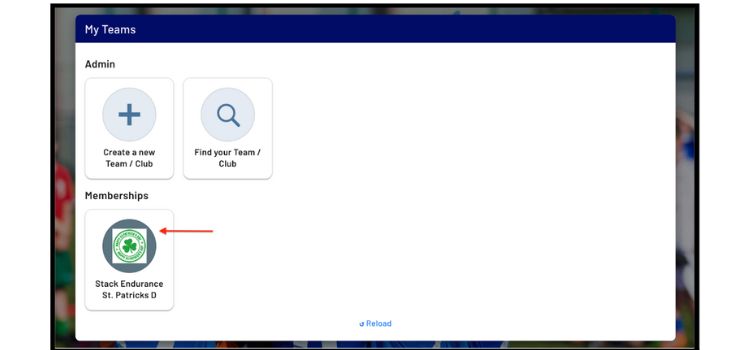
Accessing Your Event Day Check-In QR Code
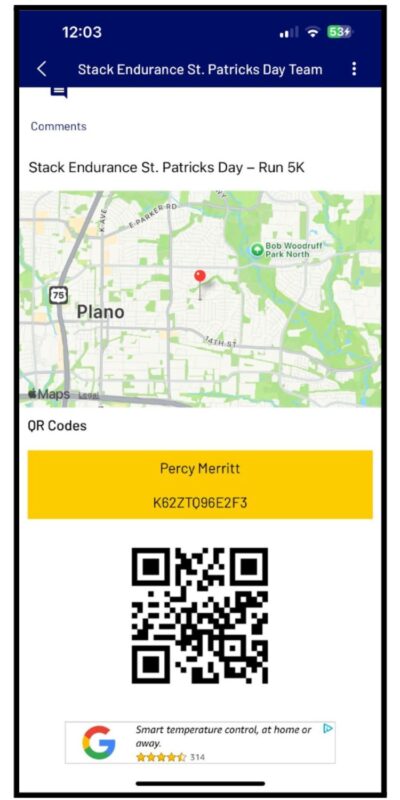
If QR code check-ins are enabled for your event, you can easily access your QR code within the app. To access your QR code, select the event tile you wish to open. Within your event, you will see a tile titled “My Tickets”.
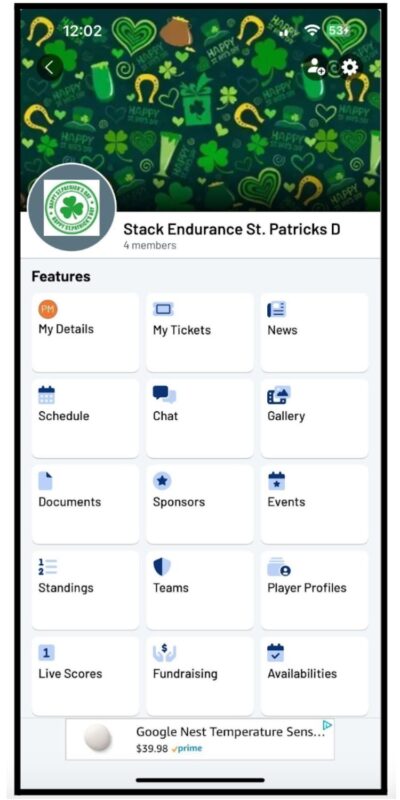
Select this tile and then the category you wish to open. This will open the category-specific page for your event. At the bottom of this screen will be your QR code for event day check-in.
Additional Features
Your Event Day app includes a variety of features customized by the Event Organizer. We encourage you to explore the app to discover all available options.
If you have any questions about the app or its features, please contact your event’s designated point of contact for assistance.
FAQ’s
Event Organizers / Race Directors
To begin using STA, you must first log in to the GMR admin portal. Once logged in, select the event you’d like to turn STA on for. Within the event summary page, navigate to the “Race Day Tools” section and select “Stack Team App Settings”. From the STA management page, you will be able to toggle ON or OFF the STA integration based on event category(s) (an event-wide setting is also available if you would like to turn STA on for all categories).
Upon successful registration, participants will receive an invitation email to STA. This email will guide them through the process of activating their application.
If you choose to turn off your STA integration, all new participants will not receive invitation emails upon successful registration. However, participants who have already logged into their app will still have access to STA. If you would like to remove your app permanently, please submit a support request here.
GMR stores participant data even while the STA integration is toggled OFF. If you choose to toggle the setting ON after registrations are received, GMR will automatically send all current participant data over so STA knows to invite all past participants. Future participants will receive their invitations upon registration.
To better market your event, use the Design & Appearance settings within your app. From here, you’ll be able to customize your app’s logo & banner.
To grant app access to other event organizers, you will need to add them as admins to your GMR event with the GMR admin portal.
The best way to send out communications through the app is by utilizing the News Feature.
If your course map is a PDF file, we suggest using the Documents Feature and renaming the tile to “Course Map”.
Sponsors can be added through the Sponsors Feature
You can link an external site to your app by using one of the Custom Web Links and renaming the tile to “Race Website”.
If your results are hosted on an external site, you can link results to your app by utilizing one of the Custom Web Links and renaming the tile to “Results”.
Participants
After registering for an event, you should receive an email invitation from Stack Team App. Follow the instructions presented in the email to get started.
Event check-in QR codes can be found within the “My Tickets” section of your app. For step-by-step instructions, please review the Accessing Your Event Check-In QR Code section above.
At this time, QR codes are not transferable. We recommend screenshotting the QR code image or forwarding the GMR confirmation email to the participant.
All of the QR codes linked to your email will be visible within the “My Tickets” section of the app.
If you don’t see a QR code within your app, please double-check with your Event Organizer that QR codes are enabled for your event category. QR codes will only display if they are enabled. If you continue to have issues, please contact our service team at [email protected].
QR codes represent a single registration for a single event/category.
